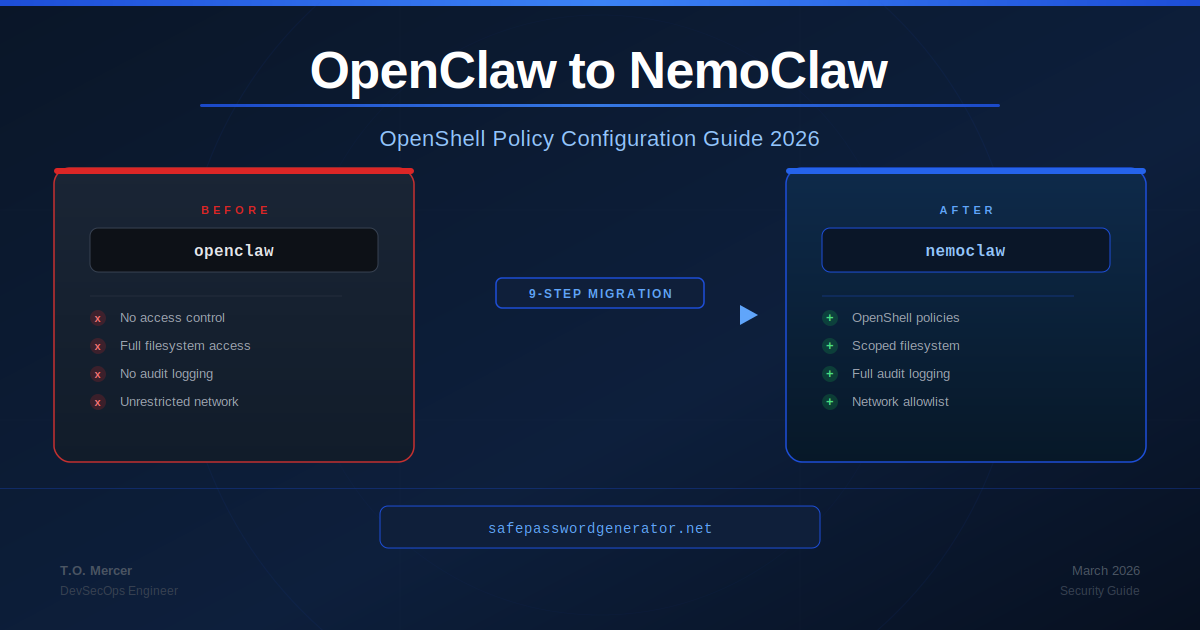
Raw OpenClaw gives AI agents unrestricted access to your file system, credentials, and network by default. NemoClaw changes that model by inserting OpenShell - a policy-based runtime - between your agents and everything they touch. Getting OpenShell policy configuration right is the migration step that determines whether NemoClaw actually protects you or just adds a layer of false confidence. This guide covers the full migration procedure and deep-dives into OpenShell policy configuration for engineers moving from a raw OpenClaw install.
What Changes: OpenClaw vs NemoClaw
Understanding what NemoClaw adds at a conceptual level prevents misconfiguration.
| Dimension | Raw OpenClaw | OpenClaw + NemoClaw |
|---|---|---|
| Access control model | None. Agents inherit OS-user permissions at runtime. | Policy-based. OpenShell evaluates every agent action against a YAML policy before execution. |
| File system scope | Full system access by default. | Directory-scoped per policy. Agents only see what you explicitly allow. |
| Network egress | Unrestricted outbound calls. | Allowlist-based via OpenShell. Deny-all-else is the default posture. |
| Credential handling | Hard-coded or .env files readable by any agent process. | Reduced exposure via policy. Not retroactive - credentials already accessed remain at risk until rotated. |
| Data routing | Cloud APIs by default for all workloads. | Local Nemotron routing for sensitive workloads on NVIDIA hardware. Cloud routing applies sanitization rules. |
| Audit logging | None by default. | Full agent action log at configurable verbosity. |
| Prompt injection blast radius | Unlimited - a hijacked agent has your full permissions. | Scoped to policy allowances. A hijacked agent can only do what the policy permits. |
| License | MIT | Apache 2.0 |
The core mental model shift: OpenClaw trusts agents. NemoClaw trusts policies and verifies agents against them on every action.
Pre-Migration Checklist
Complete every item before running a single install command.
Access and environment
- Confirm you have sudo or administrator rights on the target machine
- Verify Node.js version:
node --version- must be 18.x or higher - Confirm current OpenClaw version:
openclaw --version - Document all active OpenClaw skills:
openclaw skills list --show-permissions - Document all active OAuth tokens:
openclaw auth list - Note any OpenClaw environment variables set in
~/.bashrc,~/.zshrc, or system environment
Credential audit
- List all API keys, tokens, and service credentials OpenClaw has had access to
- Identify which credentials are stored in
.envfiles within OpenClaw working directories - Flag credentials in scope for more than 30 days for mandatory rotation post-migration
Backup
- Back up OpenClaw config:
cp -r ~/.openclaw ~/.openclaw.bak.$(date +%Y%m%d) - Export OpenClaw activity log if available:
openclaw logs export --output openclaw-activity-$(date +%Y%m%d).json - Document current OpenClaw skill list and permission scopes
Rollback plan
- Confirm you can reinstall OpenClaw from the backup if NemoClaw breaks existing workflows
- Identify automation scripts that depend on OpenClaw and may require policy updates
- Set a rollback decision window - recommended 48 hours before removing the OpenClaw backup
Migration Steps
Run the OpenClaw security audit
Before installing anything, map the current exposure surface.
openclaw security audit --deepDocument every warning. Pay specific attention to:
gateway.trusted_proxies_missing- your Gateway is exposed without proxy validationcontrol_ui.insecure_auth- your control UI accepts unauthenticated requestscredentials.permissions.too_permissive- credential files are world-readable
These warnings identify what NemoClaw policies need to address explicitly. Do not skip this step. See the OpenClaw Security Audit Checklist for per-warning remediation.
Rotate credentials before installing NemoClaw
NemoClaw adds forward-looking controls. It does not retroactively secure credentials OpenClaw has already accessed. Rotate now, before the new layer gives you false confidence.
For every API key, token, and service credential in scope: generate a new credential, update your application config, revoke the old credential in the target service, and verify the old credential no longer works.
Also revoke all OpenClaw OAuth tokens:
openclaw auth revoke --allInstall NemoClaw
curl -fsSL https://nvidia.com/nemoclaw.sh | bashVerify the install completed:
nemoclaw --versionRun onboarding
For existing OpenClaw users - use the import flag:
nemoclaw onboard --import-from=openclawThe --import-from=openclaw flag analyzes your OpenClaw activity logs and generates a baseline OpenShell policy from your actual usage patterns. Review the generated policy carefully before accepting it. Some patterns the import surfaces may be exactly what you want to restrict going forward.
For fresh installs:
nemoclaw onboardInitialize a deny-all baseline policy
Do not accept any auto-generated policy as your production policy without starting from a zero-trust baseline.
openshell policy init --deny-allThis generates a policy where the agent has zero filesystem, network, and process permissions. You then explicitly whitelist only what is necessary. See the OpenShell Policy Configuration Guide below.
Test existing automation under the new policy
Run your existing OpenClaw scripts under the new policy. Scripts requiring broad filesystem or network access will surface as policy violations in the OpenShell log:
# PLACEHOLDER: confirm log path with your NemoClaw install docs
tail -f /var/log/openshell/agent.logReview each violation. Either update the script scope to stay within the policy, or extend the policy to explicitly accommodate the script's legitimate access needs. Do not blanket-extend the policy to silence violations without understanding each one.
Enable local Nemotron routing (NVIDIA GPU hardware only)
If you are running on NVIDIA GeForce RTX, RTX PRO, or DGX hardware:
nemoclaw config set router.mode=local-firstWith local-first mode active, sensitive workloads route to an on-device Nemotron model. No API calls leave the machine for those workloads.
Enable verbose audit logging for the first two weeks
Set in your openshell.yaml policy file:
logging:
  level: verbose
destination: "/var/log/openshell/agent.log"Decommission raw OpenClaw (when ready)
Only after confirming all workflows run correctly under NemoClaw:
# PLACEHOLDER: confirm service name with your OS and OpenClaw version
systemctl disable openclaw-gatewayDo not uninstall OpenClaw until after your rollback window has passed. For full removal, see the OpenClaw complete uninstall guide.
Post-Migration Validation
Smoke tests
1. Confirm OpenShell is active:
nemoclaw statusExpected output includes OpenShell: active and your current policy file path.
2. Confirm policy is enforcing: Attempt an action your policy explicitly denies. The action should be blocked and logged.
3. Confirm audit logging is active:
tail -n 20 /var/log/openshell/agent.logSuccess signals
- All existing automation runs without unexpected policy violations
- OpenShell log shows agent actions being evaluated and allowed/denied per policy
- No
trusted_proxies_missingorinsecure_authwarnings inopenclaw security audit --deepoutput - Old credentials are confirmed revoked in target services
nemoclaw statusshows all components healthy
OpenShell Policy Configuration Guide
This is the section most migration guides skip. Getting policy configuration wrong either leaves you exposed (too permissive) or breaks your workflows (too restrictive).
The policy model
OpenShell policies are YAML files that define what an agent is permitted to do. Every agent action is evaluated against the active policy before execution. If the action is not explicitly allowed, it is denied and logged.
Policies are evaluated in this order:
- Global deny rules (applied first, override everything)
- Capability-specific allow rules
- Default posture (deny-all if you initialized with
--deny-all)
Authentication policy
# openshell.yaml - Authentication Policy
version: "2026-03"
agent_id: "your-agent-name"  # Replace with your agent identifier

authentication:
  require_signed_requests: true
  allowed_identity_providers:
    - "local"                  # Local machine identity
    # - "your-idp-endpoint"   # PLACEHOLDER: add your IdP if applicable
  session_timeout_minutes: 60
revoke_on_policy_change: true # Forces re-auth when policy is updatedNetwork and egress policy
network:
  mode: "allowlist"
  allow_domains:
    - "api.github.com"         # Source control
    - "pypi.org"               # Python packages
    - "registry.npmjs.org"     # Node packages
    # Add your specific API endpoints here
  deny_patterns:
    - "*.amazonaws.com"        # Block direct AWS calls unless explicitly needed
    - "*.googleusercontent.com"
  deny_all_else: true

  local_routing:
    force_local_on_sensitive: true
    sensitivity_keywords:
      - "password"
      - "api_key"
      - "secret"
      - "token"
- "credential"Filesystem and path policy
**/.* deny pattern is the single most important line in any filesystem policy. It blocks every hidden file on the system with one wildcard - covering .env, .git, .ssh, AWS credential files, browser sessions, and any other dotfile. Without it, a prompt-injected agent can read your entire credential surface.
capabilities:
  file_system:
    allow:
      - "/home/your-username/projects/your-project/**"  # PLACEHOLDER
      - "/tmp/agent-workspace"
    deny:
      - "**/.*"              # Block ALL hidden files (.env, .git, .ssh, .aws)
      - "/home/**/.ssh/**"   # Explicit SSH key block
      - "/etc/passwd"
      - "/etc/shadow"
      - "**/node_modules/**"
    write_policy: "explicit"  # Read-only by default
    write_allow:
      - "/tmp/agent-workspace"
- "/home/your-username/projects/your-project/output/**" # PLACEHOLDERLogging and auditing policy
logging:
  level: verbose          # Use verbose for first 2 weeks, then standard
  destination: "/var/log/openshell/agent.log"
  include_denied_actions: true
  include_allowed_actions: true
  rotate_policy:
    max_size_mb: 100
    keep_days: 30
  alert_on:
    - "credential_access_attempt"
    - "policy_violation_repeated"  # 3+ violations in 5 minutes
- "write_outside_allowed_paths"OpenClaw settings mapped to OpenShell policy patterns
| OpenClaw configuration | Equivalent OpenShell policy pattern |
|---|---|
| No config - full filesystem access | file_system.allow + explicit deny: ["**/.*"] |
| Unrestricted network calls | network.mode: "allowlist" + explicit allow_domains |
.env file for credentials | deny: ["**/.env"] + rotate to secrets manager |
openclaw config set gateway.trusted_proxies | authentication.require_signed_requests: true |
export OPENCLAW_DISABLE_BONJOUR=1 | Handled automatically by NemoClaw onboarding |
chmod 600 ~/.openclaw/credentials/* | file_system.write_policy: "explicit" + credential rotation |
| No audit logging | logging.level: verbose + include_denied_actions: true |
| Unrestricted skill permissions | capabilities.plugins.allowlist: ["skill-1", "skill-2"] |
NemoClaw Hardware Requirements
No NVIDIA GPU is required to install NemoClaw or run OpenShell policy enforcement. GPU hardware is only needed for local Nemotron routing - the feature that keeps sensitive workloads off cloud servers.
| Hardware tier | Local Nemotron routing | OpenShell enforcement | Notes |
|---|---|---|---|
| Any CPU (Intel, AMD, Apple Silicon) | No | Yes | Full policy enforcement. Cloud routing only. |
| NVIDIA GeForce RTX 30 series | Limited | Yes | Local routing possible, performance constrained on large workloads. |
| NVIDIA GeForce RTX 40 series | Yes | Yes | Recommended minimum for local-first routing in dev environments. |
| NVIDIA GeForce RTX 50 series | Yes (optimal) | Yes | Best performance for local Nemotron on single-workstation setups. |
| NVIDIA RTX PRO workstations | Yes | Yes | Recommended for team or multi-agent deployments. |
| NVIDIA DGX systems | Yes (enterprise) | Yes | Enterprise-grade local routing for production agentic workloads. |
CUDA requirement: Local Nemotron routing requires CUDA 12.x or higher. Verify with nvidia-smi before enabling router.mode=local-first.
Password Manager Protection with OpenShell
Many engineers running OpenClaw or NemoClaw also use browser-based password managers like Bitwarden, 1Password, or Dashlane. OpenShell policies can explicitly protect these tools from agent access.
Why this matters
Password manager browser extensions store session tokens and vault unlock keys in browser profile directories. Without an explicit deny rule, an AI agent running on your machine can read these files the same way it can read any other file in scope.
OpenShell policy for password manager protection
# openshell.yaml - Password Manager Protection
capabilities:
  file_system:
    deny:
      # Mac - Chrome and Firefox profile directories
      - "**/Library/Application Support/Google/Chrome/Default/Local Extension Settings/**"
      - "**/Library/Application Support/Mozilla/Firefox/Profiles/**"
      # Linux - Chrome and Firefox profile directories
      - "**/.config/google-chrome/Default/Local Extension Settings/**"
      - "**/.mozilla/firefox/**"
      # Windows - PLACEHOLDER: adjust for your username
      - "**/AppData/Local/Google/Chrome/User Data/Default/**"
      - "**/AppData/Roaming/Mozilla/Firefox/Profiles/**"
      # Common password manager local vault files
      - "**/.local/share/1password/**"
      - "**/1Password/**"
- "**/.bitwarden/**"Password manager comparison: agent coexistence
Bitwarden stores vault data in an encrypted local SQLite database. The encryption is strong but the database file is accessible to any process with your OS-user permissions. The deny rules above block agent access to that path.
1Password uses a similar local vault model with additional memory protection on the unlock key. Their Unified Access feature (2026) adds an API layer for managing secrets in agentic contexts - relevant if you are building agents that need to retrieve credentials programmatically rather than reading files directly.
Dashlane operates primarily cloud-side with local caching. Less local file exposure but vault data transits cloud infrastructure by default.
For any of these: deny agent filesystem access to browser profile directories via OpenShell policy, rotate any credentials in scope before NemoClaw was installed, and use a password manager's official API or CLI for any legitimate agent credential retrieval rather than direct file reads.
Credential management during migration
You are about to rotate a lot of passwords.
NemoClaw migration requires rotating every credential OpenClaw has accessed. A password manager generates truly random unique credentials for every service and stores them with zero-knowledge encryption.
NordPass: Try free for 30 days.
Try NordPass Free for 30 DaysFree plan available. Affiliate link: we may earn a commission at no extra cost to you.
Password Length Requirements After Migration
NemoClaw migration surfaces credential hygiene issues that often require updated password standards across your organization. Use this table when generating new credentials during the rotation step.
| Use case | Minimum length | Recommended | Notes |
|---|---|---|---|
| General accounts | 15 characters | 16+ characters | NIST SP 800-63B minimum as of 2024 update |
| Admin and privileged accounts | 16 characters | 20+ characters | CISA recommendation for privileged access |
| API keys and service credentials | 32 characters | 64 characters | Use a generator, never manual composition |
| Password manager master password | 16 characters | 20+ characters | Must be memorable - consider a passphrase |
| NemoClaw service account passwords | 20 characters | 32 characters | Rotate every 90 days |
Why length matters more than complexity
The most common mistake during credential rotation is generating passwords that meet complexity rules but are too short. A 12-character password with full complexity takes approximately 3,000 years to crack with 2026 GPU hardware. A 16-character password takes 438 million years. The difference between 12 and 16 characters is not marginal - it is several orders of magnitude.
Use a cryptographically secure generator for every new credential. See the Password Length 2026 Guide for the full NIST breakdown, or generate credentials directly with the 16-character password generator for privileged accounts and the 64-character generator for API keys. For office and guest SSID credential rotation, use our WiFi password generator.
Troubleshooting
openshell policy violation on every agent action--deny-all and no allow rules added yet..env files after migration**/.* deny pattern is missing from your filesystem policy.- "**/.*" to your file_system.deny list. Confirm it is above any allow rules in evaluation order./var/log/openshell/agent.log for the specific denied actions. Add minimum necessary allow rules for legitimate access only.nemoclaw onboard --import-from=openclaw generates an overly permissive policyrouter.mode is not set to local-first, or CUDA hardware is not detected.nemoclaw config get router.mode to check current setting. Run nemoclaw status to confirm CUDA detection. Check local_routing.force_local_on_sensitive: true in your policy file.openclaw security audit --deep still shows warnings after migrationnone.logging.level is set to verbose or standard in your policy file.Final Migration Checklist
Pre-migration
- OpenClaw security audit completed and warnings documented
- All credentials rotated
- OpenClaw OAuth tokens revoked
- OpenClaw config directory backed up
- Rollback plan documented and tested
Installation
- NemoClaw installed and version confirmed
- Onboarding completed with
--import-from=openclawflag - Deny-all baseline policy initialized
- Policy file reviewed and minimum necessary allow rules added
-
**/.*deny pattern confirmed in filesystem policy - Verbose logging enabled
Validation
-
nemoclaw statusshows all components healthy - Smoke test: denied action blocked and logged correctly
- Smoke test: allowed action executes and logs correctly
- Existing automation runs without unexpected policy violations
- Old credentials confirmed revoked in target services
-
openclaw security audit --deepshows no critical warnings
Decommission
- Rollback window passed (recommended 48 hours)
- OpenClaw gateway service disabled from autostart
- OpenClaw backup retained for 30 days minimum before deletion
Related Reading
- OpenClaw Security Audit Checklist: per-warning remediation for pre-migration audit findings
- How to Uninstall OpenClaw Completely: full removal guide for post-migration cleanup
- NemoClaw vs OpenClaw: Security Architecture Comparison: conceptual overview of what NemoClaw adds
- Best Password Managers 2026: evaluated on security architecture and agent coexistence
- Password Length 2026 Guide: NIST SP 800-63B requirements for credential rotation
- 16-Character Password Generator: CISA recommended length for privileged accounts
DevSecOps engineer, M.S. Information Systems, KCSA certified. 10+ years securing enterprise systems. This guide reflects publicly available NemoClaw documentation as of March 2026. Verify commands against current official documentation before running in production.
T.O. Mercer | SafePasswordGenerator.net